In the second meeting, we got started with the project itself.
Our first task was to determine, having chosen to build a candy-sorting machine, whether we could actually sort candies reliably based on color. Our answer would come with an investigation of the light sensor and how it read colors under various conditions. I suppose we could think of this as the basic research phase, as opposed to applied research, which one doesn't normally think about when doing a robotics project.
We fired up the Bricx Command Center, which offers some great remote-control options for the prototyping and testing stage, as well as very decent NQC development environment. After some initial stumbling (it has been a long time since I've used this), we were able to set the sensor types and get data back in its various formats.
Above: Ron, Irina, and Laura work on testing the M&Ms in our test apparatus.
We chose M&Ms as our candy to sort primarily because the color consistency is carefully quality-controlled, so we knew even if we ate them all, we'd be able to get more in the same color. In addition, we rejected jelly beans because of variation in color, especially among multiple brands. This particular M&M type is also "mostly round" in shape, which should help with the color identification process, at least in theory. We surmised, additionally, that ratio of logo size to overall surface area on plain M&Ms might produce too much deviation in color readings, although we did not positively determine if that was the case.
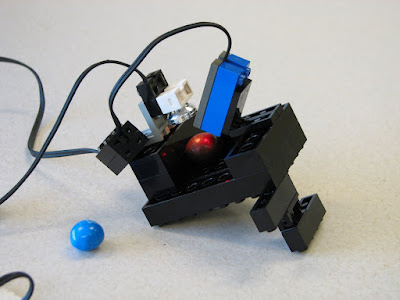
Discovery: The two different light sensors we have, seen in the test candy holder above, do not produce the same readings. There is enough variation to throw off any programmed color detection. We will need to account for this when we actually get down to writing code. (This is why it's good programming practice to define constants to allow for value tweaking.)
We talked about how ambient light as well as supplied light might greatly affect the readings, and discovered that was completely correct.
We mounted the Lego light and the Lego light sensor tangent to the candy, and checked our readings with and without the light. This turned out to be important, because the readings we got for yellow and orange were very similar, but by adding and toggling the external light source, we can easily differentiate the colors under those conditions.
Because ambient light levels so dramatically affected the readings we got, we put the whole apparatus under a large box to get our final readings. We will have to enclose or shade the test chamber in our final product.
Our final test bench, above, used a pocket set at an angle to keep the M&M in the proper place.
The readings, done under a box, gave us the following results using "raw" sensor data:
| Color |
Value |
Value with Added Light |
| Orange |
725 |
565 |
| Red |
735 |
558 |
| Yellow |
721 |
617 |
| Blue |
819 |
571 |
| Green |
779 |
565 |
| Brown |
785 |
564 |
Notice that the values for orange and yellow are very close, but that if we get into that range, we can programmatically activate the light to differentiate them. Otherwise, we shouldn't need to activate the second light.
Next week we will begin prototyping the mechanism, our first bit of real Lego assembly. I am eager to see how it goes.


